Grafana 发布了名为 “loki” 的新项目, 用于解决云原生架构下的日志收集与存储问题. loki 受 Prometheus 影响很深, github 主页 上的简介则是 Like Prometheus, but for logs..
分析 loki 代码之前, 不得不先提一下 cortex 项目. cortex 是一个 Prometheus 的 Remote Backend, 核心价值是为 Prometheus 添加了水平扩展和(廉价的)指标长期存储能力. cortex 的完整设计可以看看它的设计白皮书, 这里摘几个要点:
- 扩展: 读写分离, 写入端分两层, 第一层
distributor 做一致性哈希, 将负载分发到第二层 ingester 上, ingester 在内存中缓存 Metrics 数据, 异步写入 Storage Backend - 易于维护: 所有节点无状态, 随时可以迁移扩展
- 成本: 以
chunk 作为基本存储对象, 可以用廉价的对象存储(比如 S3)来作为 Storage Backend
loki 和 cortex 的作者都是 tomwilkie, loki 也完全沿用了 cortex 的distributor, ingester, querier, chunk 这一套.
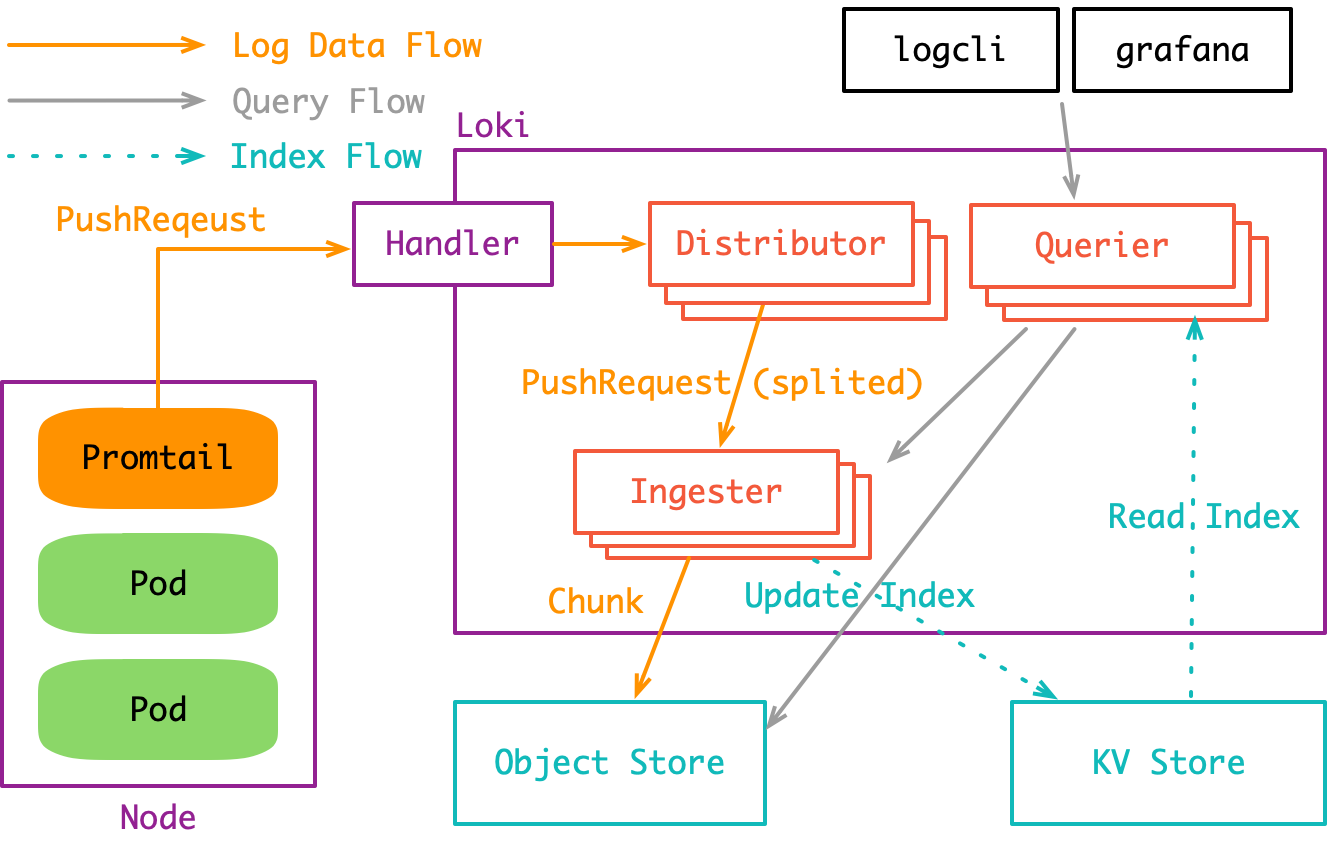
在 cortex 体系中, Prometheus 只是一个 Metrics 采集器: 收集指标, 然后扔给 cortex. 我们只要把 Prometheus 这个组件替换成采集日志的 Promtail, 就(差不多)得到了 loki:

这个架构图与 cortex 的架构图 相差无几. 唯一不同的是 Prometheus 可以部署在一个远端集群中, 而 Promtail 必须部署到所有需要日志收集的 Node 上去.
目前 loki 的运行模式还是 All in One 的, 即distributor, querier, ingester这些组件全都跑在 loki 主进程里. 不过这些组件之间的交互全都通过 gRPC 完成, 因此只要稍加改造就能作为一个分布式系统来跑.
promtail 可以理解为采集日志的 “Prometheus”. 它最巧妙的设计是完全复用了 Prometheus 的服务发现机制与 label 机制.
以 Kubernetes 服务发现为例, Prometheus 可以通过 Pod 的 Annotations 与 Labels 等信息来确定 Pod 是否需要抓取指标, 假如要的话 Pod 的指标暴露在哪个端口上, 以及这个 Pod 本身有哪些 label, 即 target label.
确定了这些信息之后, Prometheus 就可以去拉应用的指标了. 同时, 这些指标都会被打上 target label, 用于标注指标的来源. 等到在查询的时候, 我们就可以通过 target label, 比方说 pod_name=foo-123512 或 service=user-service 来获取特定的一个或一组 Pod 上的指标信息.
promtail 是一样的道理. 它也是通过 Pod 的一些元信息来确定该 Pod 的日志文件位置, 同时为日志打上特定的 target label. 但要注意, 这个 label 不是标注在每一行日志事件上的, 而是被标注在”整个日志”上的. 这里”整个日志”在 loki 中抽象为 stream(日志流). 这就是 loki 文档中所说的”不索引日志, 只索引日志流”. 最终在查询端, 我们通过这些 label 就可以快速查询一个或一组特定的 stream.
服务发现部分的代码非常直白, 可以去 pkg/promtail/targetmanager.go 中自己看一下, 提两个实现细节:
promtail 要求所有 target 都跟自己属于同一个 node, 处于其它 node 上的 target 会被忽略;promtail 使用 target 的 __path__ label 来确定日志路径;
通过服务发现确定要收集的应用以及应用的日志路径后, promtail 就开始了真正的日志收集过程. 这里分三步:
- 用
fsnotify 监听对应目录下的文件创建与删除(处理 log rolling) - 对每个活跃的日志文件起一个 goroutine 进行类似
tail -f 的读取, 读取到的内容发送给 channel - 一个单独的 goroutine 会解析
channel 中的日志行, 分批发送给 loki 的 backend
首先是 fsnotify(源码里的一些错误处理会简略掉)
 1
 2
 3
 4
 5
 6
 7
 8
 9
10
11
12
13
14
15
16
17
18
19
20
21
22
23
24
25
26
27
28
29
| for {
select {
case event := <-t.watcher.Events:
switch event.Op {
case fsnotify.Create:
// protect against double Creates.
if _, ok := t.tails[event.Name]; ok {
level.Info(t.logger).Log("msg", "got 'create' for existing file", "filename", event.Name)
continue
}
// newTailer 中会启动一个 goroutine 来读目标文件
tailer := newTailer(t.logger, t.handler, t.positions, t.path, event.Name)
t.tails[event.Name] = tailer
case fsnotify.Remove:
tailer, ok := t.tails[event.Name]
if ok {
// 关闭 tailer
helpers.LogError("stopping tailer", tailer.stop)
delete(t.tails, event.Name)
}
}
case err := <-t.watcher.Errors:
level.Error(t.logger).Log("msg", "error from fswatch", "error", err)
case <-t.quit:
return
}
}
|
接下来是 newTailer() 这个方法中启动的日志文件读取逻辑:
 1
 2
 3
 4
 5
 6
 7
 8
 9
10
11
12
13
14
15
16
17
18
19
20
21
22
23
24
25
26
27
28
29
| func newTailer() {
tail := tail.TailFile(path, tail.Config{
Follow: true,
Location: &tail.SeekInfo{
Offset: positions.Get(path),
Whence: 0,
},
})
tailer := ...
go tailer.run()
}
func (t *tailer) run() {
for {
select {
case <-positionWait.C:
// 定时同步当前读取位置
pos := t.tail.Tell()
t.positions.Put(t.path, pos)
case line, ok := <-t.tail.Lines:
// handler.Handle() 中是一些日志行的预处理逻辑, 最后将日志行转化为 `Entry` 对象扔进 channel
if err := t.handler.Handle(model.LabelSet{}, line.Time, line.Text); err != nil {
level.Error(t.logger).Log("msg", "error handling line", "error", err)
}
}
}
}
|
这里直接调用了 hpcloud/tail 这个包来完成文件的 tail 操作. hpcloud/tail 的内部实现中, 在读到 EOF 之后, 同样调用了 fsnotify 来获取新内容写入的通知. fsnotify 这个包内部则是依赖了 inotify_init 和 inotify_add_watch 这两个系统调用, 可以参考inotify.
最后是日志发送, 这里有一个单独的 goroutine 会读取所有 tailer 通过 channel 传过来的日志(Entry对象), 然后按批发送给 loki:
 1
 2
 3
 4
 5
 6
 7
 8
 9
10
11
12
13
14
15
16
17
18
19
20
21
22
23
24
25
26
27
28
29
30
31
32
33
34
35
36
37
38
| for {
// 每次发送之后要重置计时器
maxWait.Reset(c.cfg.BatchWait)
select {
case <-c.quit:
return
case e := <-c.entries:
// Batch 足够大之后, 执行发送逻辑
if batchSize+len(e.Line) > c.cfg.BatchSize {
c.send(batch)
// 重置 Batch
batchSize = 0
batch = map[model.Fingerprint]*logproto.Stream{}
}
// 收到 Entry, 先写进 Batch 当中
batchSize += len(e.Line)
// 每个 entry 要根据 label 放进对应的日志流(Stream)中
fp := e.labels.FastFingerprint()
stream, ok := batch[fp]
if !ok {
stream = &logproto.Stream{
Labels: e.labels.String(),
}
batch[fp] = stream
}
stream.Entries = append(stream.Entries, e.Entry)
case <-maxWait.C:
// 到达每个批次的最大等待时间, 同样执行发送
if len(batch) > 0 {
c.send(batch);
batchSize = 0
batch = map[model.Fingerprint]*logproto.Stream{}
}
}
}
|
这段代码中出现了 Entry(一条日志) 的 label, 看上去好像和一开始说的 “loki只索引日志流” 自相矛盾. 但其实这里只是代码上的实现细节, Entry 的 label 完全来自于服务发现, 最后发送时, label 也只是用于标识 Stream, 与上层抽象完全符合.
另外, 用 channel + select 写 batch 逻辑真的挺优雅, 简单易读.
目前 promtail 的代码还完全不到 production-ready, 它的本地没有 buffer, 并且没有处理 back pressure. 假设 loki 的流量太大处理不过来了, 那么 promtail 日志发送失败或超时直接就会丢日志. 同时, 文件读取位置, LAG(当前行数和文件最新行数的距离) 这些关键的监控指标都没暴露出来, 这是一个提 PR 的好时机.
接下来是存储端, 这一部分在官方博客中就已经说得比较多了, 而且图很好看, 我也不拾人牙慧了. 挑几个重点看一下:
distributor 直接接收来自 promtail 的日志写入请求, 请求体由 protobuf 编码, 格式如下:
 1
 2
 3
 4
 5
 6
 7
 8
 9
10
11
12
13
14
| // 一次写入请求, 包含多段日志流
type PushRequest struct {
Streams []*Stream `protobuf:"bytes,1,rep,name=streams" json:"streams,omitempty"`
}
// 一段日志流, 包含它的 label, 以及这段日志流当中的每个日志事件: Entry
type Stream struct {
Labels string `protobuf:"bytes,1,opt,name=labels,proto3" json:"labels,omitempty"`
Entries []Entry `protobuf:"bytes,2,rep,name=entries" json:"entries"`
}
// 一个日志事件, 包含时间戳与内容
type Entry struct {
Timestamp time.Time `protobuf:"bytes,1,opt,name=timestamp,stdtime" json:"timestamp"`
Line string `protobuf:"bytes,2,opt,name=line,proto3" json:"line,omitempty"`
}
|
distributor 收到请求后, 会将一个 PushRequest 中的 Stream 根据 labels 拆分成多个 PushRequest, 这个过程使用一致性哈希:
 1
 2
 3
 4
 5
 6
 7
 8
 9
10
11
12
13
14
15
16
17
18
19
20
21
22
23
24
25
26
| streams := make([]streamTracker, len(req.Streams))
keys := make([]uint32, 0, len(req.Streams))
for i, stream := range req.Streams {
// 获取每个 stream 的 label hash
keys = append(keys, tokenFor(userID, stream.Labels))
streams[i].stream = stream
}
// 根据 label hash 到 hash ring 上获取对应的 ingester 节点
// 这里的节点指 hash ring 上的节点, 一个节点可能有多个对等的 ingester 副本来做 HA
replicationSets := d.ring.BatchGet(keys, ring.Write)
// 将 Stream 按对应的 ingester 节点进行分组
samplesByIngester := map[string][]*streamTracker{}
ingesterDescs := map[string]ring.IngesterDesc{}
for i, replicationSet := range replicationSets {
for _, ingester := range replicationSet.Ingesters {
samplesByIngester[ingester.Addr] = append(samplesByIngester[ingester.Addr], &streams[i])
ingesterDescs[ingester.Addr] = ingester
}
}
for ingester, samples := range samplesByIngester {
// 每组 Stream[] 又作为一个 PushRequest, 下发给对应的 ingester 节点
d.sendSamples(localCtx, ingester, samples, &tracker)
}
|
在 All in One 的运行模式中, hash ring 直接存储在内存中. 在生产环境, 由于要起多个 distributor 节点做高可用, 这个 hash ring 会存储到外部的 Consul 集群中.
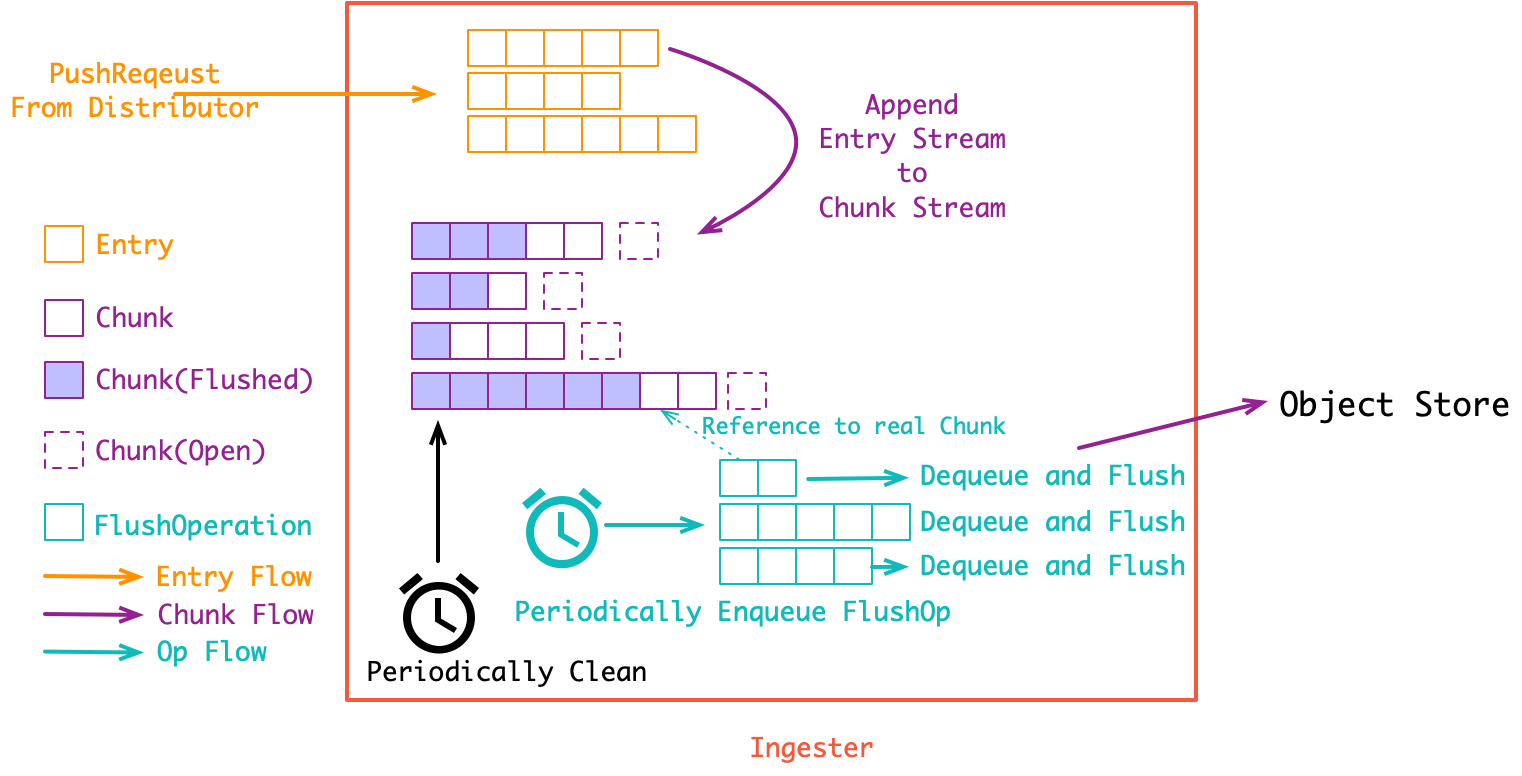
ingester 接收 distributor 下发的 PushRequest, 也就是多段日志流([]Entry). 在 ingester 内部会先将收到的 []Entry Append 到内存中的 Chunk 流([]Chunk). 同时会有一组 goroutine 异步将 Chunk 流存储到对象存储当中:

第一个 Append 过程很关键(代码有简化):
 1
 2
 3
 4
 5
 6
 7
 8
 9
10
11
12
13
14
15
16
17
18
19
20
21
22
23
24
25
26
27
28
| func (i *instance) Push(ctx context.Context, req *logproto.PushRequest) error {
for _, s := range req.Streams {
// 将收到的日志流 Append 到内存中的日志流上, 同样地, 日志流按 label hash 索引
fp := client.FastFingerprint(req.labels)
stream, ok := i.streams[fp]
if !ok {
stream = newStream(fp, req.labels)
// 这个过程中, 还会维护日志流的倒排索引(label -> stream)
i.index.Add(labels, fp)
i.streams[fp] = stream
}
stream.Push(ctx, s.Entries)
}
return nil
}
func (s *stream) Push(_ context.Context, entries []logproto.Entry) error {
for i := range entries {
// 假如当前 Chunk 已经关闭或者已经到达设定的最大 Chunk 大小, 则再创建一个新的 Chunk
if s.chunks[0].closed || !s.chunks[0].chunk.SpaceFor(&entries[i]) {
s.chunks = append(s.chunks, chunkDesc{
chunk: chunkenc.NewMemChunk(chunkenc.EncGZIP),
})
}
s.chunks[len(s.chunks)-1].chunk.Append(&entries[i])
}
return nil
}
|
Chunk 其实就是多条日志构成的压缩包. 将日志压成 Chunk 的意义是可以直接存入对象存储, 而对象存储是最便宜的(便宜是 loki 的核心目标之一). 在 一个 Chunk 到达指定大小之前它就是 open 的, 会不断 Append 新的日志(Entry) 到里面. 而在达到大小之后, Chunk 就会关闭等待持久化(强制持久化也会关闭 Chunk, 比如关闭 ingester 实例时就会关闭所有的 Chunk并持久化).
对 Chunk 的大小控制是一个调优要点:
- 假如 Chunk 容量过小: 首先是导致压缩效率不高. 同时也会增加整体的 Chunk 数量, 导致倒排索引过大. 最后, 对象存储的操作次数也会变多, 带来额外的性能开销;
- 假如 Chunk 过大: 一个 Chunk 的 open 时间会更长, 占用额外的内存空间, 同时, 也增加了丢数据的风险. 最后, Chunk 过大也会导致查询读放大, 比方说查一小时的数据却要下载整天的 Chunk;
丢数据问题: 所有 Chunk 要在 close 之后才会进行存储. 因此假如 ingester 异常宕机, 处于 open 状态的 Chunk, 以及 close 了但还没有来得及持久化的 Chunk 数据都会丢失. 从这个角度来说, ingester 其实也是 stateful 的, 在生产中可以通过给 ingester 跑多个副本来解决这个问题. 另外, ingester 里似乎还没有写 WAL, 这感觉是一个 PR 机会, 可以练习一下写存储的基本功.
异步存储过程就很简单了, 是一个一对多的生产者消费者模型:
 1
 2
 3
 4
 5
 6
 7
 8
 9
10
11
12
13
14
15
16
17
18
19
20
21
22
23
24
25
26
| // 一个 goroutine 将所有的待存储的 chunks enqueue
func (i *Ingester) sweepStream(instance *instance, stream *stream, immediate bool) {
// 有一组待存储的队列(默认16个), 取模找一个队列把要存储的 chunk 的引用塞进去
flushQueueIndex := int(uint64(stream.fp) % uint64(i.cfg.ConcurrentFlushes))
firstTime, _ := stream.chunks[0].chunk.Bounds()
i.flushQueues[flushQueueIndex].Enqueue(&flushOp{
model.TimeFromUnixNano(firstTime.UnixNano()), instance.instanceID,
stream.fp, immediate,
})
}
// 每个队列都有一个 goroutine 作为消费者在 dequeue
func (i *Ingester) flushLoop(j int) {
for {
op := i.flushQueues[j].Dequeue()
// 实际的存储操作在这个方法中, 存储完成后, Chunk 会被清理掉
i.flushUserSeries(op.userID, op.fp, op.immediate)
// 存储失败的 chunk 会重新塞回队列中
if op.immediate && err != nil {
op.from = op.from.Add(flushBackoff)
i.flushQueues[j].Enqueue(op)
}
}
}
|
最后是清理过程, 同样是一个单独的 goroutine 定时在跑. ingester 里的所有 Chunk 会在持久化之后隔一小段时间才被清理掉. 这个”一小段时间”由 chunk-retain-time 参数进行控制(默认 15 分钟). 这么做是为了加速热点数据的读取(真正被人看的日志中, 有99%都是生成后的一小段时间内被查看的).
最后是 Querier, 这个比较简单了, 大致逻辑就是根据chunk index中的索引信息, 请求 ingester 和对象存储. 合并后返回. 这里主要看一下”合并”操作:
这里的代码其实可以作为一个简单的面试题: 假如你的日志按 class 分成了上百个文件, 现在要将它们合并输出(按时间顺序), 你会怎么做?
loki 里用了堆, 时间正序就用最小堆, 时间逆序就用最大堆:
 1
 2
 3
 4
 5
 6
 7
 8
 9
10
11
12
13
14
15
16
17
18
19
20
21
22
23
24
25
26
27
28
29
30
31
32
33
34
35
36
37
38
39
40
41
42
43
44
45
46
47
48
49
50
51
52
53
54
55
56
57
58
59
60
61
62
63
64
65
66
67
68
69
70
71
72
73
74
75
76
77
78
79
| // 这部分代码实现了一个简单的二叉堆, MinHeap 和 MaxHeap 实现了相反的 `Less()` 方法
type iteratorHeap []EntryIterator
func (h iteratorHeap) Len() int { return len(h) }
func (h iteratorHeap) Swap(i, j int) { h[i], h[j] = h[j], h[i] }
func (h iteratorHeap) Peek() EntryIterator { return h[0] }
func (h *iteratorHeap) Push(x interface{}) {
*h = append(*h, x.(EntryIterator))
}
func (h *iteratorHeap) Pop() interface{} {
old := *h
n := len(old)
x := old[n-1]
*h = old[0 : n-1]
return x
}
type iteratorMinHeap struct {
iteratorHeap
}
func (h iteratorMinHeap) Less(i, j int) bool {
return h.iteratorHeap[i].Entry().Timestamp.Before(h.iteratorHeap[j].Entry().Timestamp)
}
type iteratorMaxHeap struct {
iteratorHeap
}
func (h iteratorMaxHeap) Less(i, j int) bool {
return h.iteratorHeap[i].Entry().Timestamp.After(h.iteratorHeap[j].Entry().Timestamp)
}
// 将一组 Stream 的 iterator 合并成一个 HeapIterator
func NewHeapIterator(is []EntryIterator, direction logproto.Direction) EntryIterator {
result := &heapIterator{}
switch direction {
case logproto.BACKWARD:
result.heap = &iteratorMaxHeap{}
case logproto.FORWARD:
result.heap = &iteratorMinHeap{}
default:
panic("bad direction")
}
// pre-next each iterator, drop empty.
for _, i := range is {
result.requeue(i)
}
return result
}
func (i *heapIterator) requeue(ei EntryIterator) {
if ei.Next() {
heap.Push(i.heap, ei)
return
}
if err := ei.Error(); err != nil {
i.errs = append(i.errs, err)
}
helpers.LogError("closing iterator", ei.Close)
}
func (i *heapIterator) Next() bool {
if i.curr != nil {
i.requeue(i.curr)
}
if i.heap.Len() == 0 {
return false
}
i.curr = heap.Pop(i.heap).(EntryIterator)
currEntry := i.curr.Entry()
// keep popping entries off if they match, to dedupe
for i.heap.Len() > 0 {
next := i.heap.Peek()
nextEntry := next.Entry()
if !currEntry.Equal(nextEntry) {
break
}
next = heap.Pop(i.heap).(EntryIterator)
i.requeue(next)
}
return true
}
|
写源码分析的文章还是挺累的, 虽然前面说了不拾人牙慧, 但最后还是要重复一下 Grafana 官方已经说了的一些要点, 那就是 loki 的思路和 ELK 这样的思路确实完全不同. loki 不索引日志内容大大减轻了存储成本, 同时聚焦于 distribute grep, 而不再考虑各种分析,报表的花架子, 也让”日志”的作用更为专一: 服务于可观察性.
另外, Grafana loki 为 Grafana 生态填上了可观察性中的重要一环, logging. 再加上早已成为 CloudNative 中可观察性事实标准的 Prometheus + Grafana Stack, Grafana 生态已经只缺 Trace 这一块了(他们的 Slides 中提到已经在做了), 未来可期.
最后想说的是, 现今摩尔定律已近失效, 没有了每年翻一番的硬件性能, 整个后端架构需要更精细化地运作. 像以前那样用昂贵的全文索引或者列式存储直接存大量低价值的日志信息(99%没人看)已经不合时宜了. 在程序的运行信息(“日志”)和埋点,用户行为等业务信息(也是”日志”)之间进行业务,抽象与架构上的逐步切分, 让各自的架构适应到各自的 ROI 最大的那个点上, 会是未来的趋势, 而 Grafana Loki 则恰到好处地把握住了这个趋势.
monitoring
https://www.infoq.cn/article/thfsXOQwv0lL*5UDAkjF
KubeCon 的 Slides
design doc
一篇介绍性的 Blog
Github 主页上的 Getting Started

