新建一个非常简单的 info.txt 文件。
1
2
3
4
5
| [root@linux0.11]$ cat > info.txt <<EOF
name:flash
age:28
language:java
EOF
|
在命令行输入一条十分简单的命令。
1
2
| [root@linux0.11]$ cat info.txt | wc -l
3
|
这条命令的意思是读取刚刚的 info.txt 文件,输出它的行数。
通过上两回的讲解,即 第46回 | 读硬盘数据全流程 和 第47回 | 读取硬盘数据的细节,我们知道了应用程序发起 read 最终读取到硬盘数据的全部细节。
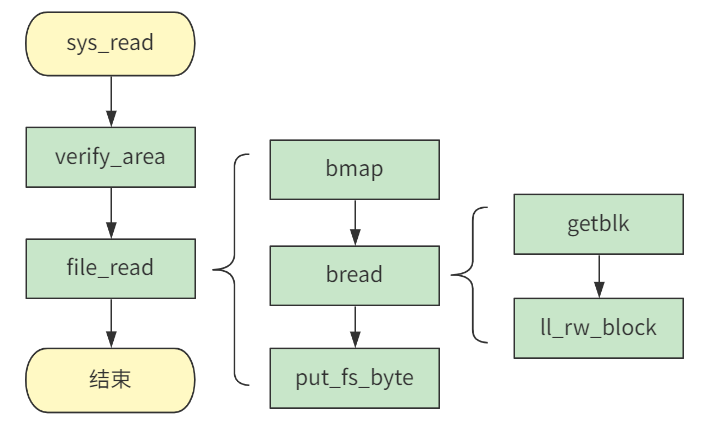
再配合上 42 到 45 回的内容,我们解释清楚了从键盘输入,到 shell 程序最终解释执行你输入的命令的全过程。
我们继续往下进行,如果在你的程序正在被 shell 程序执行时,你按下了键盘中的 CTRL+C,你的程序就被迫终止,并再次返回到了 shell 等待用户输入命令的状态。
1
2
3
| [root@linux0.11]$ cat info.txt | wc -l
...(这里假设程序要执行很长时间,此时按下ctrl+c)^C
[root@linux0.11]$
|
我们今天就来解释这个过程。
当你按下 CTRL+C 时。
根据 第42回 | 用键盘输入一条命令 所讲述的内容,键盘中断处理函数自然会走到处理字符的 copy_to_cooked() 函数里。
 1
 2
 3
 4
 5
 6
 7
 8
 9
10
| #define INTMASK (1<<(SIGINT-1))
// kernel/chr_drv/tty_io.c
void copy_to_cooked (struct tty_struct *tty) {
...
if (c == INTR_CHAR(tty)) {
tty_intr(tty, INTMASK);
continue;
}
...
}
|
这个函数里有一段上述代码,翻译起来特别简单,就是当 INTR_CHAR 发现字符为中断字符时(其实就是 CTRL+C),就调用 tty_intr() 给进程发送信号。
tty_intr 函数很简单,就是给所有组号等于 tty 组号的进程,发送信号。
 1
 2
 3
 4
 5
 6
 7
 8
 9
10
| // kernel/chr_drv/tty_io.c
void tty_intr (struct tty_struct *tty, int mask) {
int i;
...
for (i = 0; i < NR_TASKS; i++) {
if (task[i] && task[i]->pgrp == tty->pgrp) {
task[i]->signal |= mask;
}
}
}
|
而如何发送信号,在这段源码中也揭秘了,其实就是给进程 task_struct 结构中的 signal 的相应位置 1 而已。
发送什么信号,在上面的宏定义中也可以看出,就是 SIGINT 信号。
SIGINT 就是个数字,它是几呢?它就定义在 signal.h 这个头文件里。
 1
 2
 3
 4
 5
 6
 7
 8
 9
10
11
12
13
14
15
16
17
18
19
20
21
22
23
24
25
26
27
28
29
30
31
32
33
34
| // signal.h
#define SIGHUP 1 /* hangup */
#define SIGINT 2 /* interrupt */
#define SIGQUIT 3 /* quit */
#define SIGILL 4 /* illegal instruction (not reset when caught) */
#define SIGTRAP 5 /* trace trap (not reset when caught) */
#define SIGABRT 6 /* abort() */
#define SIGPOLL 7 /* pollable event ([XSR] generated, not supported) */
#define SIGIOT SIGABRT /* compatibility */
#define SIGEMT 7 /* EMT instruction */
#define SIGFPE 8 /* floating point exception */
#define SIGKILL 9 /* kill (cannot be caught or ignored) */
#define SIGBUS 10 /* bus error */
#define SIGSEGV 11 /* segmentation violation */
#define SIGSYS 12 /* bad argument to system call */
#define SIGPIPE 13 /* write on a pipe with no one to read it */
#define SIGALRM 14 /* alarm clock */
#define SIGTERM 15 /* software termination signal from kill */
#define SIGURG 16 /* urgent condition on IO channel */
#define SIGSTOP 17 /* sendable stop signal not from tty */
#define SIGTSTP 18 /* stop signal from tty */
#define SIGCONT 19 /* continue a stopped process */
#define SIGCHLD 20 /* to parent on child stop or exit */
#define SIGTTIN 21 /* to readers pgrp upon background tty read */
#define SIGTTOU 22 /* like TTIN for output if (tp->t_local<OSTOP)
*/#define SIGIO 23 /* input/output possible signal
*/#define SIGXCPU 24 /* exceeded CPU time limit
*/#define SIGXFSZ 25 /* exceeded file size limit
*/#define SIGVTALRM 26 /* virtual time alarm
*/#define SIGPROF 27 /* profiling time alarm
*/#define SIGWINCH 28 /* window size changes
*/#define SIGINFO 29 /* information request
*/#define SIGUSR1 30 /* user defined signal 1
*/#define SIGUSR2 31 /* user defined signal 2 */
|
这里我把所有 Linux 0.11 支持的信号都放在这了,有我们熟悉的按下 CTRL+C 时的信号 SIGINT,有我们通常杀死进程时 kill -9 的信号 SIGKILL,还有 core dump 内存访问出错时经常遇到的 SIGSEGV。
在现代 Linux 操作系统中,你输入个 kill -l 便可知道你所在的系统所支持的信号,下面是我在我购买的一台腾讯云主机上的结果。

OK,这么几句话,我就说完了信号的本质,以及信号的种类。
现在这个进程的 tast_struct 结构中的 signal 就有了对应信号位的值,那么在下次时钟中断到来时,便会通过 timer_interrupt 这个时钟中断处理函数,一路调用到 do_signal 方法。
 1
 2
 3
 4
 5
 6
 7
 8
 9
10
11
12
13
14
15
| // kernel/signal.c
void do_signal (long signr ...) {
...
struct sigaction *sa = current->sigaction + signr - 1;
sa_handler = (unsigned long) sa->sa_handler;
// 如果信号处理函数为空,则直接退出
if (!sa_handler) {
...
do_exit (1 << (signr - 1));
...
}
// 否则就跳转到信号处理函数的地方运行
*(&eip) = sa_handler;
...
}
|
时钟中断和进程调度的流程,你可以看 第24回 | 从一次定时器滴答来看进程调度,这里不再展开。
我们可以看到,进入 do_signal 函数后,如果当前信号 signr 对应的信号处理函数 sa_handler 为空时,就直接调用 do_exit 函数退出,也就是我们看到的按下 CTRL+C 之后退出的样子了。
但是,如果信号处理函数不为空,那么就通过将 sa_handler 赋值给 eip 寄存器,也就是指令寄存器的方式,跳转到相应信号处理函数处运行。
怎么验证这一点呢?很简单,信号处理函数注册在每个进程 task_struct 中的 sigaction 数组中。
 1
 2
 3
 4
 5
 6
 7
 8
 9
10
11
12
13
14
15
16
17
| // signal.h
struct sigaction {
union __sigaction_u __sigaction_u; /* signal handler */
sigset_t sa_mask; /* signal mask to apply */
int sa_flags; /* see signal options below */
};
/* union for signal handlers */
union __sigaction_u {
void (*__sa_handler)(int);
void (*__sa_sigaction)(int, struct __siginfo *, void *);
};
// sched.h
struct task_struct {
...
struct sigaction sigaction[32];
...
}
|
没错,只需要给 sigaction 对应位置处填写上信号处理函数即可。
那么如何注册这个信号处理函数呢,通过调用 signal 这个库函数即可。
我们可以写一个小程序。
 1
 2
 3
 4
 5
 6
 7
 8
 9
10
11
| #include <stdio.h>
#include <signal.h>
void int_handler(int signal_num) {
printf("signal receive %d\n", signal_num);
}
int main(int argc, char ** argv) {
signal(SIGINT, int_handler);
for(;;)
pause();
return 0;
}
|
这是个死循环的 main 函数,只不过,通过 signal 注册了 SIGINT 的信号处理函数,里面做的事情仅仅是打印一下信号值。
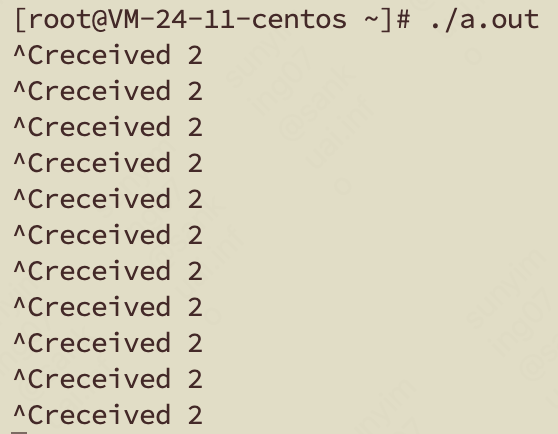
编译并运行它,我们会发现在按下 CTRL+C 之后程序不再退出,而是输出了我们 printf 的话。

我们多次按 CTRL+C,这个程序仍然不会退出,会一直输出上面的话。
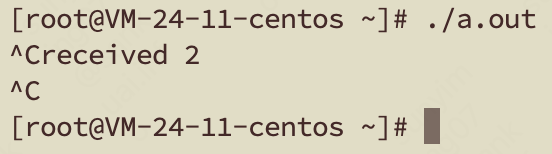
这就做到了亲手捕获 SIGINT 这个信号。但这个程序有点不友好,永远无法 CTRL+C 结束了,我们优化一下代码,让第一次按下 CTRL+C 后的信号处理函数,把 SIGINT 的处理函数重新置空。
 1
 2
 3
 4
 5
 6
 7
 8
 9
10
11
12
| #include <stdio.h>
#include <signal.h>
void int_handler(int signal_num) {
printf("signal receive %d\n", signal_num);
signal(SIGINT, NULL);
}
int main(int argc, char ** argv) {
signal(SIGINT, int_handler);
for(;;)
pause();
return 0;
}
|
我们发现,这次按下第二次 CTRL+C 程序就会退出了,这也间接证明了,当没有为 SIGINT 注册信号处理函数时,程序接收到 CTRL+C 的 SIGINT 信号时便会退出。
至此,有关信号的内容,就讲明白了。
信号是进程间通信的一种方式,管道也是进程间通信的一种方式,
所以通过 第45回 | 解析并执行 shell 命令 讲述的管道原理,与本回讲述的信号原理,你已经掌握了进程间通信的两种方式了。
通过这种类似 “倒叙” 的讲述方法,希望你能明白,其实技术的本质并不复杂,只不过被抽象之后,由于你不了解下面的细节,就变得云里雾里了。