新建一个非常简单的 info.txt 文件。
1
2
3
4
5
| $ cat > info.txt <<EOF
name:flash
age:28
language:java
EOF
|
在命令行输入一条十分简单的命令。
1
2
| [root@linux0.11]$ cat info.txt | wc -l
3
|
这条命令的意思是读取刚刚的 info.txt 文件,输出它的行数。
在上一回,我们详细解读了从键盘敲击出这个命令,到屏幕上显示出这个命令,中间发生的事情。
那今天,我们接着往下走,下一步就是,shell 程序如何读取到你输入的这条命令的。
这里我们需要知道两件事情。
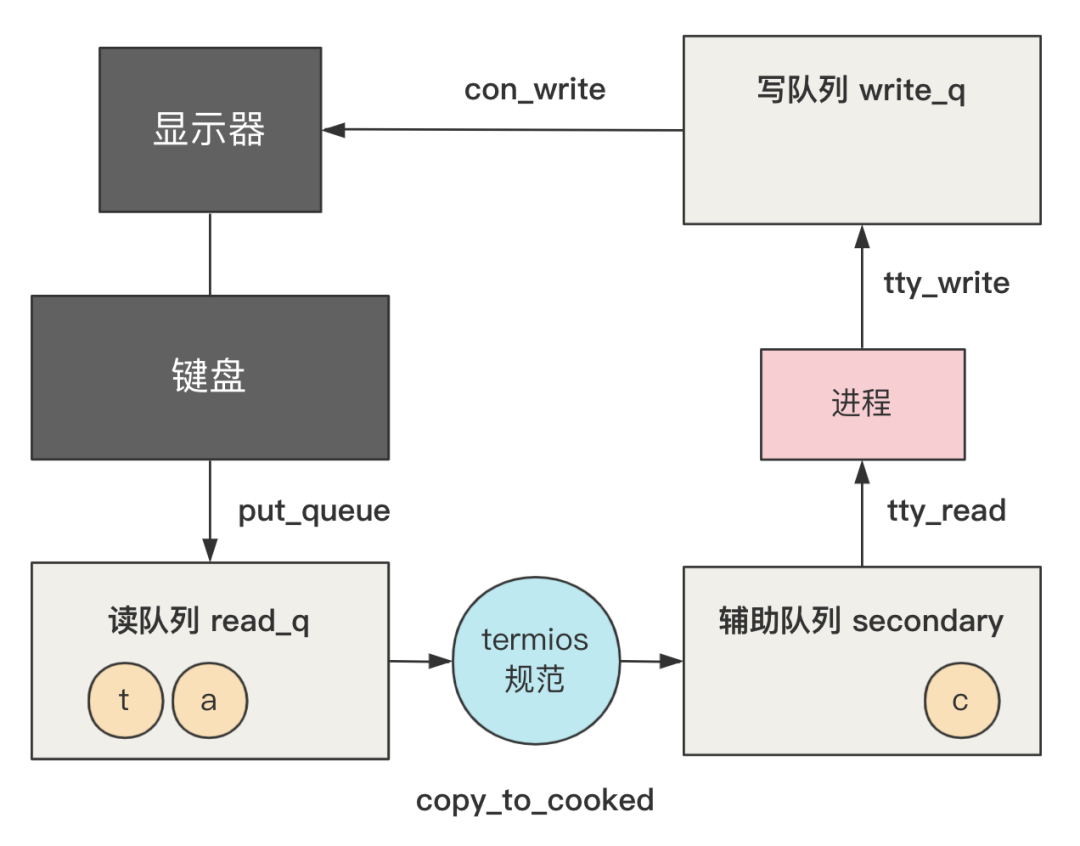
键盘输入的字符,此时已经到达了控制台终端 tty 结构中的 secondary 这个队列里。
shell 程序将通过上层的 read 函数调用,来读取这些字符。
 1
 2
 3
 4
 5
 6
 7
 8
 9
10
11
12
13
14
15
16
17
18
19
20
21
22
23
24
25
26
27
28
29
30
31
32
| // xv6-public sh.c
int main(void) {
static char buf[100];
// 读取命令
while(getcmd(buf, sizeof(buf)) >= 0){
// 创建新进程
if(fork() == 0)
// 执行命令
runcmd(parsecmd(buf));
// 等待进程退出
wait();
}
}
int getcmd(char *buf, int nbuf) {
...
gets(buf, nbuf);
...
}
char* gets(char *buf, int max) {
int i, cc;
char c;
for(i=0; i+1 < max; ){
cc = read(0, &c, 1);
if(cc < 1)
break;
buf[i++] = c;
if(c == '\n' || c == '\r')
break;
}
buf[i] = '\0';
return buf;
}
|
看,shell 程序会通过 getcmd 函数最终调用到 read 函数一个字符一个字符读入,直到读到了换行符(\n 或 \r)的时候,才返回。
读入的字符在 buf 里,遇到换行符后,这些字符将作为一个完整的命令,传入给 runcmd() 函数,真正执行这个命令。
那我们接下来的任务就是,看一下这个 read 函数是怎么把之前键盘输入并转移到 secondary 这个队列里的字符给读出来的。
read() 函数是个用户态的库函数,最终会通过系统调用中断,执行 sys_read()函数。
 1
 2
 3
 4
 5
 6
 7
 8
 9
10
11
12
13
14
15
16
17
18
19
20
21
22
23
24
25
26
27
28
| // read_write.c
// fd = 0, count = 1
int sys_read(unsigned int fd,char * buf,int count) {
struct file * file = current->filp[fd];
// 校验 buf 区域的内存限制
verify_area(buf,count);
struct m_inode * inode = file->f_inode;
// 管道文件
if (inode->i_pipe)
return (file->f_mode&1)?read_pipe(inode,buf,count):-EIO;
// 字符设备文件
if (S_ISCHR(inode->i_mode))
return rw_char(READ,inode->i_zone[0],buf,count,&file->f_pos);
// 块设备文件
if (S_ISBLK(inode->i_mode))
return block_read(inode->i_zone[0],&file->f_pos,buf,count);
// 目录文件或普通文件
if (S_ISDIR(inode->i_mode) || S_ISREG(inode->i_mode)) {
if (count+file->f_pos > inode->i_size)
count = inode->i_size - file->f_pos;
if (count<=0)
return 0;
return file_read(inode,file,buf,count);
}
// 不是以上几种,就报错
printk("(Read)inode->i_mode=%06o\n\r",inode->i_mode);
return -EINVAL;
}
|
关键地方我已经标上了注释,整体结构不看细节的话特别清晰。
这个最上层的 sys_read(),把读取管道文件、字符设备文件、块设备文件、目录文件或普通文件,都放在了同一个方法里处理,这个方法作为所有读操作的统一入口,由此也可以看出 linux 下一切皆文件的思想。
read 的第一个参数是 0,也就是 0 号文件描述符,之前我们在讲第四部分的时候说过,shell 进程是由进程 1 通过 fork 创建出来的,而进程 1 在 init 的时候打开了 /dev/tty0 作为 0 号文件描述符。
1
2
3
4
5
6
7
| // main.c
void init(void) {
setup((void *) &drive_info);
(void) open("/dev/tty0",O_RDWR,0);
(void) dup(0);
(void) dup(0);
}
|
而这个 /dev/tty0 的文件类型,也就是其 inode 结构中表示文件类型与属性的 i_mode 字段,表示为字符型设备,所以最终会走到 rw_char 这个子方法下,文件系统的第一层划分就走完了。
接下来我们看 rw_char 这个方法。
 1
 2
 3
 4
 5
 6
 7
 8
 9
10
11
12
13
14
15
16
17
18
19
20
| // char_dev.c
static crw_ptr crw_table[]={
NULL, /* nodev */
rw_memory, /* /dev/mem etc */
NULL, /* /dev/fd */
NULL, /* /dev/hd */
rw_ttyx, /* /dev/ttyx */
rw_tty, /* /dev/tty */
NULL, /* /dev/lp */
NULL
};
/* unnamed pipes */
int rw_char(int rw,int dev, char * buf, int count, off_t * pos) {
crw_ptr call_addr;
if (MAJOR(dev)>=NRDEVS)
return -ENODEV;
if (!(call_addr=crw_table[MAJOR(dev)]))
return -ENODEV;
return call_addr(rw,MINOR(dev),buf,count,pos);
}
|
根据 dev 这个参数,计算出主设备号为 4,次设备号为 0,所以将会走到 rw_ttyx 方法继续执行。
1
2
3
4
5
| // char_dev.c
static int rw_ttyx(int rw,unsigned minor,char * buf,int count,off_t * pos) {
return ((rw==READ)?tty_read(minor,buf,count):
tty_write(minor,buf,count));
}
|
根据 rw == READ 走到读操作分支 tty_read,这就终于快和上一讲的故事接上了。
以下是 tty_read 函数,我省略了一些关于信号和超时时间等非核心的代码。
 1
 2
 3
 4
 5
 6
 7
 8
 9
10
11
12
13
14
15
16
17
18
19
20
21
22
23
| // tty_io.c
// channel=0, nr=1
int tty_read(unsigned channel, char * buf, int nr) {
struct tty_struct * tty = &tty_table[channel];
char c, * b=buf;
while (nr>0) {
...
if (EMPTY(tty->secondary) ...) {
sleep_if_empty(&tty->secondary);
continue;
}
do {
GETCH(tty->secondary,c);
...
put_fs_byte(c,b++);
if (!--nr)
break;
} while (nr>0 && !EMPTY(tty->secondary));
...
}
...
return (b-buf);
}
|
入参有三个参数,非常简单。
channel 为 0,表示 tty_table 里的控制台终端这个具体的设备。buf 是我们要读取的数据拷贝到内存的位置指针,也就是用户缓冲区指针。nr 为 1,表示我们要读出 1 个字符。
整个方法,其实就是不断从 secondary 队列里取出字符,然后放入 buf 指所指向的内存。
如果要读取的字符数 nr 被减为 0,说明已经完成了读取任务,或者说 secondary 队列为空,说明不论你任务完没完成我都没有字符让你继续读了,那此时调用 sleep_if_empty 将线程阻塞,等待被唤醒。
其中 GETCH 就是个宏,改变 secondary 队列的队头队尾指针,你自己写个队列数据结构,也是这样的操作,不再展开讲解。
1
2
| #define GETCH(queue,c) \
(void)({c=(queue).buf[(queue).tail];INC((queue).tail);})
|
同理,判空逻辑就更为简单了,就是队列头尾指针是否相撞。
1
| #define EMPTY(a) ((a).head == (a).tail)
|
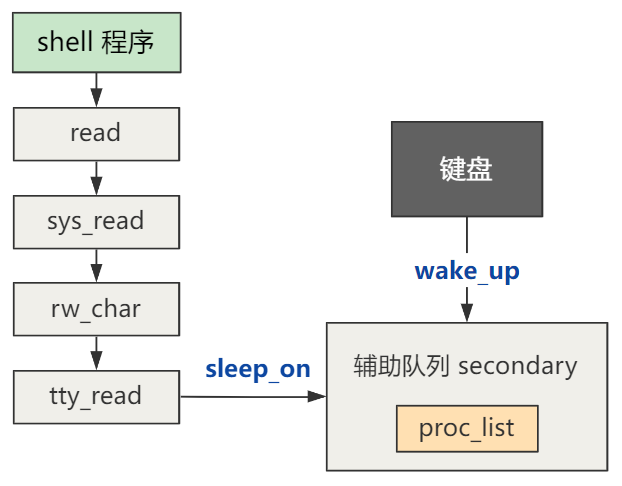
理解了这些小细节之后,再明白一行关键的代码,整个 read 到 tty_read 这条线就完全可以想明白了。
那就是队列为空,即不满足继续读取条件的时候,让进程阻塞的 sleep_if_empty,我们看看。
 1
 2
 3
 4
 5
 6
 7
 8
 9
10
11
12
13
14
15
16
17
18
19
20
21
22
23
24
25
| sleep_if_empty(&tty->secondary);
// tty_io.c
static void sleep_if_empty(struct tty_queue * queue) {
cli();
while (!current->signal && EMPTY(*queue))
interruptible_sleep_on(&queue->proc_list);
sti();
}
// sched.c
void interruptible_sleep_on(struct task_struct **p) {
struct task_struct *tmp;
...
tmp=*p;
*p=current;
repeat:
current->state = TASK_INTERRUPTIBLE;
schedule();
if (*p && *p != current) {
(**p).state=0;
goto repeat;
}
*p=tmp;
if (tmp)
tmp->state=0;
}
|
我们先只看一句关键的代码,就是将当前进程的状态设置为可中断等待。
1
| current->state = TASK_INTERRUPTIBLE;
|
那么执行到进程调度程序时,当前进程将不会被调度,也就相当于阻塞了,不熟悉进程调度的同学可以复习一下 第23回 | 如果让你来设计进程调度。
进程被调度了,什么时候被唤醒呢?
当我们再次按下键盘,使得 secondary 队列中有字符时,也就打破了为空的条件,此时就应该将之前的进程唤醒了,这在上一回 第42回 | 用键盘输入一条命令 一讲中提到过了。
1
2
3
4
5
6
7
8
| // tty_io.c
void do_tty_interrupt(int tty) {
copy_to_cooked(tty_table+tty);
}
void copy_to_cooked(struct tty_struct * tty) {
...
wake_up(&tty->secondary.proc_list);
}
|
可以看到,在 copy_to_cooked 里,在将 read_q 队列中的字符处理后放入 secondary 队列中的最后一步,就是唤醒 wake_up 这个队列里的等待进程。
而 wake_up 函数更为简单,就是修改一下状态,使其变成可运行的状态。
1
2
3
4
5
6
| // sched.c
void wake_up(struct task_struct **p) {
if (p && *p) {
(**p).state=0;
}
}
|
总体流程就是这个样子的。
当然,进程的阻塞与唤醒是个体系,还有很多细节,我们下一回再仔细展开这部分的内容。