新建一个非常简单的 info.txt 文件。
1
2
3
4
5
| $ cat > info.txt <<EOF
name:flash
age:28
language:java
EOF
|
在命令行输入一条十分简单的命令。
1
2
| [root@linux0.11] cat info.txt | wc -l
3
|
这条命令的意思是读取刚刚的 info.txt 文件,输出它的行数。
我们先从最初始的状态开始说起。
最初始的状态,电脑屏幕前只有这么一段话。
然后,我们按下按键 ‘c’,将会变成这样。
我们再按下 ‘a’
接下来,我们再依次按下 ’t'、空格、‘i’ 等等,才变成了这样。
1
| [root@linux0.11] cat info.txt | wc -l
|
我们今天就要解释这个看起来十分"正常"的过程。
凭什么我们按下键盘后,屏幕上就会出现如此的变化呢?老天爷规定的么?
我们就从按下键盘上的 ‘c’ 键开始说起。
首先,得益于 第16回 | 控制台初始化 tty_init 中讲述的一行代码。
1
2
3
4
5
6
| // console.c
void con_init(void) {
...
set_trap_gate(0x21, &keyboard_interrupt);
...
}
|
我们成功将键盘中断绑定在了 keyboard_interrupt 这个中断处理函数上,也就是说当我们按下键盘 ‘c’ 时,CPU 的中断机制将会被触发,最终执行到这个 keyboard_interrupt 函数中。
我们来到 keyboard_interrupt 函数一探究竟。
 1
 2
 3
 4
 5
 6
 7
 8
 9
10
11
12
13
| // keyboard.s
keyboard_interrupt:
...
// 读取键盘扫描码
inb $0x60,%al
...
// 调用对应按键的处理函数
call *key_table(,%eax,4)
...
// 0 作为参数,调用 do_tty_interrupt
pushl $0
call do_tty_interrupt
...
|
很简单,首先通过 IO 端口操作,从键盘中读取了刚刚产生的键盘扫描码,就是刚刚按下 ‘c’ 的时候产生的键盘扫描码。
随后,在 key_table 中寻找不同按键对应的不同处理函数,比如普通的一个字母对应的字符 ‘c’ 的处理函数为 do_self,该函数会将扫描码转换为 ASCII 字符码,并将自己放入一个队列里,我们稍后再说这部分的细节。
接下来,就是调用 do_tty_interrupt 函数,见名知意就是处理终端的中断处理函数,注意这里传递了一个参数 0。
我们接着探索,打开do_tty_interrupt() 函数。
1
2
3
4
5
6
7
| // tty_io.c
void do_tty_interrupt(int tty) {
copy_to_cooked(tty_table+tty);
}
void copy_to_cooked(struct tty_struct * tty) {
...
}
|
这个函数几乎什么都没做,将 keyboard_interrupt 时传入的参数 0,作为 tty_table 的索引,找到 tty_table 中的第 0 项作为下一个函数的入参,仅此而已。
tty_table 是终端设备表,在 Linux 0.11 中定义了三项,分别是控制台、串行终端 1 和串行终端 2。
 1
 2
 3
 4
 5
 6
 7
 8
 9
10
11
12
13
14
| // tty.h
struct tty_struct tty_table[] = {
{
{...},
0, /* initial pgrp */
0, /* initial stopped */
con_write,
{0,0,0,0,""}, /* console read-queue */
{0,0,0,0,""}, /* console write-queue */
{0,0,0,0,""} /* console secondary queue */
},
{...},
{...}
};
|
我们用的往屏幕上输出内容的终端,就是 0 号索引位置处的控制台终端,所以我将另外两个终端定义的代码省略掉了。
tty_table 终端设备表中的每一项结构,是 tty_struct,用来描述一个终端的属性。
 1
 2
 3
 4
 5
 6
 7
 8
 9
10
11
12
13
14
15
16
| struct tty_struct {
struct termios termios;
int pgrp;
int stopped;
void (*write)(struct tty_struct * tty);
struct tty_queue read_q;
struct tty_queue write_q;
struct tty_queue secondary;
};
struct tty_queue {
unsigned long data;
unsigned long head;
unsigned long tail;
struct task_struct * proc_list;
char buf[TTY_BUF_SIZE];
};
|
说说其中较为关键的几个。
termios 是定义了终端的各种模式,包括读模式、写模式、控制模式等,这个之后再说。
void (*write)(struct tty_struct * tty) 是一个接口函数,在刚刚的 tty_table 中我们也可以看出被定义为了 con_write,也就是说今后我们调用这个 0 号终端的写操作时,将会调用的是这个 con_write 函数,这不就是接口思想么。
还有三个队列分别为读队列 read_q,写队列 write_q 以及一个辅助队列 secondary。
这些有什么用,我们通通之后再说,跟着我接着看。
 1
 2
 3
 4
 5
 6
 7
 8
 9
10
11
12
13
14
15
16
17
| // tty_io.c
void do_tty_interrupt(int tty) {
copy_to_cooked(tty_table+tty);
}
void copy_to_cooked(struct tty_struct * tty) {
signed char c;
while (!EMPTY(tty->read_q) && !FULL(tty->secondary)) {
// 从 read_q 中取出字符
GETCH(tty->read_q,c);
...
// 这里省略了一大坨行规则处理代码
...
// 将处理过后的字符放入 secondary
PUTCH(c,tty->secondary);
}
wake_up(&tty->secondary.proc_list);
}
|
展开 copy_to_cooked 函数我们发现,一个大体的框架已经有了。
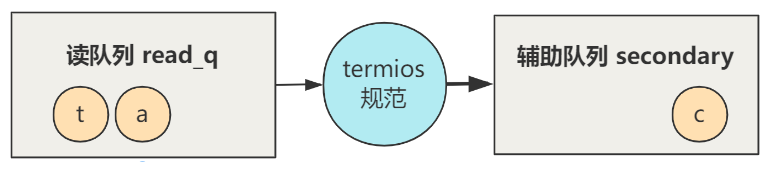
在 copy_to_cooked() 函数里就是个大循环,只要读队列 read_q 不为空,且辅助队列 secondary没有满,就不断从 read_q 中取出字符,经过一大坨的处理,写入 secondary 队列里。
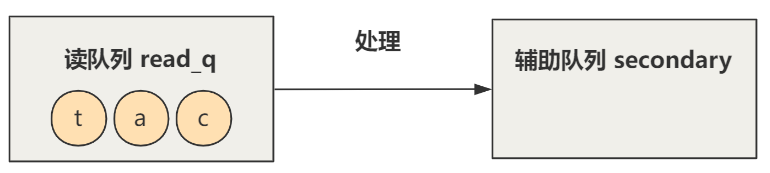
否则,就唤醒等待这个辅助队列 secondary 的进程,之后怎么做就由进程自己决定。
我们接着看,中间的一大坨处理过程做了什么事情呢?
这一大坨有太多太多的 if 判断,但都是围绕着同一个目的,我们举其中一个简单的例子。
 1
 2
 3
 4
 5
 6
 7
 8
 9
10
| #define IUCLC 0001000
#define _I_FLAG(tty,f) ((tty)->termios.c_iflag & f)
#define I_UCLC(tty) _I_FLAG((tty),IUCLC)
void copy_to_cooked(struct tty_struct * tty) {
...
// 这里省略了一大坨行规则处理代码
if (I_UCLC(tty))
c=tolower(c);
...
}
|
简单说,就是通过判断 tty 中的 termios,来决定对读出的字符 c 做一些处理。
在这里,就是判断 termios 中的 c_iflag 中的第 4 位是否为 1,来决定是否要将读出的字符 c 由大写变为小写。
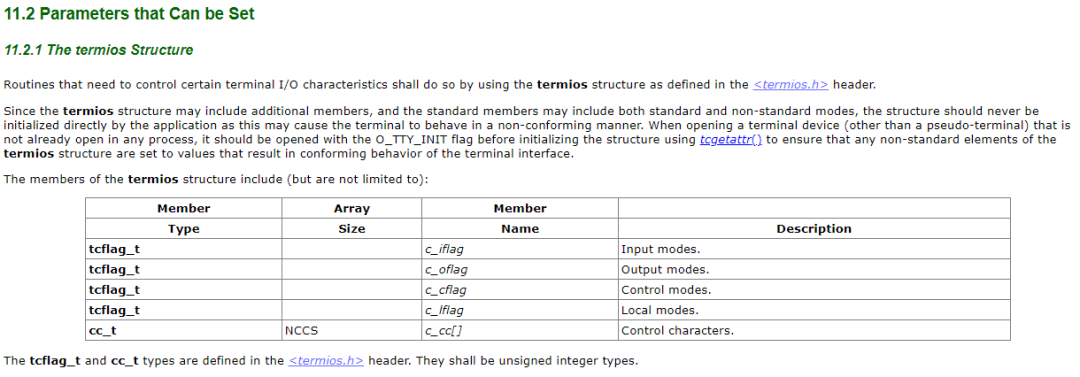
这个 termios 就是定义了终端的模式。
1
2
3
4
5
6
7
8
| struct termios {
unsigned long c_iflag; /* input mode flags */
unsigned long c_oflag; /* output mode flags */
unsigned long c_cflag; /* control mode flags */
unsigned long c_lflag; /* local mode flags */
unsigned char c_line; /* line discipline */
unsigned char c_cc[NCCS]; /* control characters */
};
|
比如刚刚的是否要将大写变为小写,是否将回车字符替换成换行字符,是否接受键盘控制字符信号如 ctrl + c 等。
这些模式不是 Linux 0.11 自己乱想出来的,而是实现了 POSIX.1 中规定的 termios 标准,具体可以参见:
https://pubs.opengroup.org/onlinepubs/9699919799/basedefs/V1_chap11.html#tag_11
好了,我们目前可以总结出,按下键盘后做了什么事情。
这里我们应该产生几个疑问。
还记不记得最开始讲的 keyboard_interrupt 函数,我们有一个方法没有展开讲。
 1
 2
 3
 4
 5
 6
 7
 8
 9
10
11
12
13
| // keyboard.s
keyboard_interrupt:
...
// 读取键盘扫描码
inb $0x60,%al
...
// 调用对应按键的处理函数
call *key_table(,%eax,4)
...
// 0 作为参数,调用 do_tty_interrupt
pushl $0
call do_tty_interrupt
...
|
就是这个 key_table,我们将其展开。
1
2
3
4
5
6
7
| // keyboard.s
key_table:
.long none,do_self,do_self,do_self /* 00-03 s0 esc 1 2 */
.long do_self,do_self,do_self,do_self /* 04-07 3 4 5 6 */
...
.long do_self,do_self,do_self,do_self /* 20-23 d f g h */
...
|
可以看出,普通的字符 abcd 这种,对应的处理函数是 do_self,我们再继续展开。
 1
 2
 3
 4
 5
 6
 7
 8
 9
10
| // keyboard.s
do_self:
...
// 扫描码转换为 ASCII 码
lea key_map,%ebx
1:
movb (%ebx,%eax),%al
...
// 放入队列
call put_queue
|
可以看到最后调用了 put_queue 函数,顾名思义放入队列,看来我们要找到答案了,继续展开。
 1
 2
 3
 4
 5
 6
 7
 8
 9
10
11
12
13
14
15
16
17
| // tty_io.c
struct tty_queue * table_list[]={
&tty_table[0].read_q,
&tty_table[0].write_q,
&tty_table[1].read_q,
&tty_table[1].write_q,
&tty_table[2].read_q,
&tty_table[2].write_q
};
// keyboard.s
put_queue:
...
movl table_list,%edx
# read-queue for console
movl head(%edx),%ecx
...
|
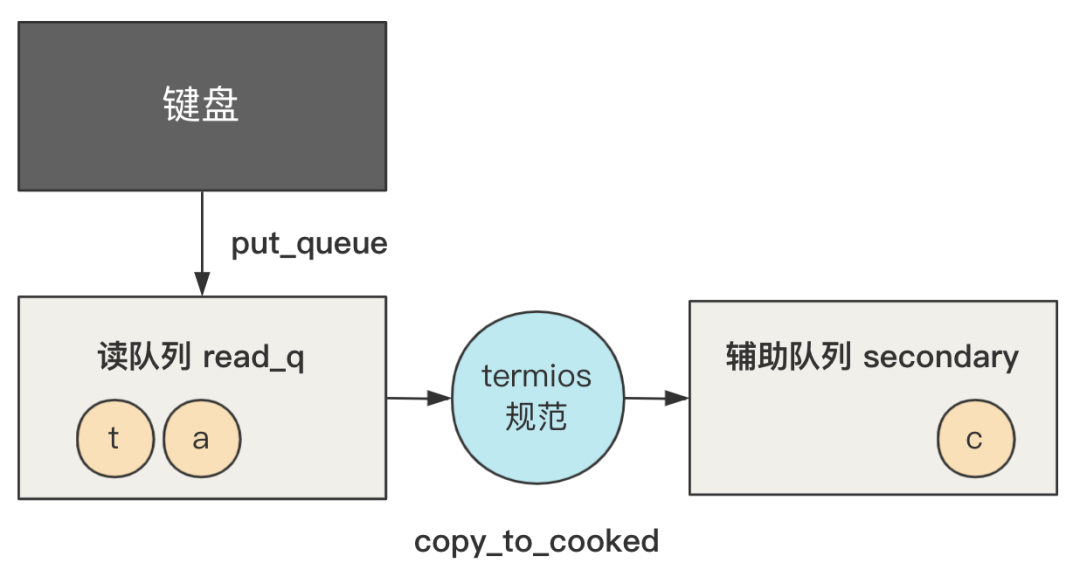
可以看出,put_queue 正是操作了我们 tty_table 数组中的零号位置,也就是控制台终端 tty 的 read_q 队列,进行入队操作。
答案揭晓了,那我们的整体流程图也可以再丰富起来。
按下键盘后,一系列代码将我们的字符放入了 secondary 队列中,然后呢?
这就涉及到上层进程调用终端的读函数,将这个字符取走了。
上层经过库函数、文件系统函数等,最终会调用到 tty_read 函数,将字符从 secondary 队列里取走。
1
2
3
4
5
6
| // tty_io.c
int tty_read(unsigned channel, char * buf, int nr) {
...
GETCH(tty->secondary,c);
...
}
|
取走后要干嘛,那就是上层应用程序去决定的事情了。
假如要写到控制台终端,那上层应用程序又会经过库函数、文件系统函数等层层调用,最终调用到 tty_write 函数。
1
2
3
4
5
6
7
8
| // tty_io.c
int tty_write(unsigned channel, char * buf, int nr) {
...
PUTCH(c,tty->write_q);
...
tty->write(tty);
...
}
|
这个函数首先会将字符 c 放入 write_q 这个队列,然后调用 tty 里设定的 write 函数。
终端控制台这个 tty 我们之前说了,初始化的 write 函数是 con_write,也就是 console 的写函数。
1
2
3
4
| // console.c
void con_write(struct tty_struct * tty) {
...
}
|
这个函数在 第16回 | 控制台初始化 tty_init 提到了,最终会配合显卡,在我们的屏幕上输出我们给出的字符。

那我们的图又可以补充了。
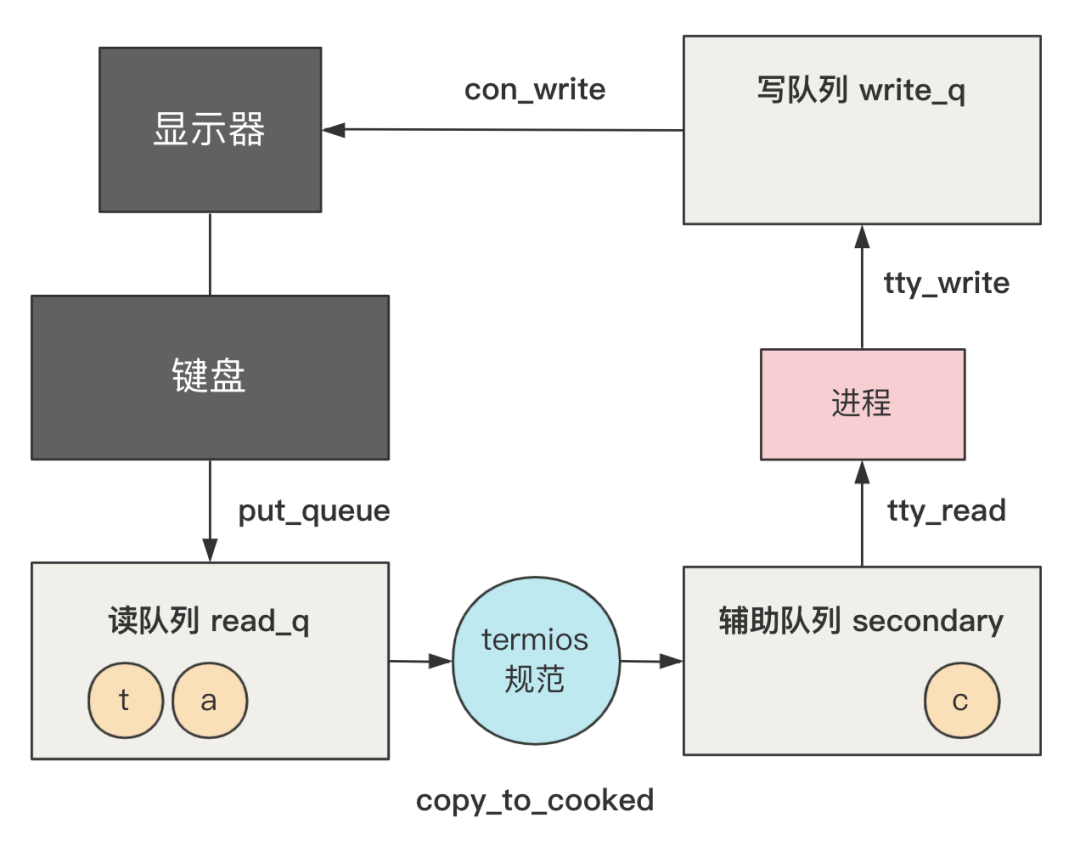
核心点就是三个队列 read_q,secondary 以及 write_q。
其中 read_q 是键盘按下按键后,进入到键盘中断处理程序 keyboard_interrupt 里,最终通过 put_queue 函数字符放入 read_q 这个队列。
secondary 是 read_q 队列里的未处理字符,通过 copy_to_cooked 函数,经过一定的 termios 规范处理后,将处理过后的字符放入 secondary。(处理过后的字符就是成"熟"的字符,所以叫 cooked,是不是很形象?)
然后,进程通过 tty_read 从 secondary 里读字符,通过 tty_write 将字符写入 write_q,最终 write_q 中的字符可以通过 con_write 这个控制台写函数,将字符打印在显示器上。
这就完成了从键盘输入到显示器输出的一个循环,也就是本回所讲述的内容。
好了,现在我们已经成功做到可以把这样一个字符串输入并回显在显示器上了。
1
| [root@linux0.11]$ cat info.txt | wc -l
|
那么接下来,shell 程序具体是如何读入这个字符串,读入后又是怎么处理的呢?